
TL;DR:
- The transom is a vital structural component that bears engine loads, wave impact forces, and rudder hardware weight. Regular inspection, careful moisture monitoring, and proper repair techniques are essential to prevent failure over the vessel’s lifespan. Proper maintenance ensures safety, longevity, and optimal performance of the sailboat.
Most sailors glance at the sailboat transom and see nothing more than the flat panel closing off the back of the hull. It is, in reality, one of the hardest-working structural components on the entire boat. It takes the full torque of an outboard engine, absorbs wave slap, carries the weight of transom-hung rudders, and acts as the mounting point for some of the most critical hardware on board. Understanding what the transom actually does will change how you inspect, maintain, and repair your vessel.
Table of Contents
- Key takeaways
- Sailboat transom design: shapes and materials
- Inspecting and maintaining your transom
- Transom damage and repair techniques
- Structural stresses and rudder mounting
- Transom extensions and boarding platforms
- My honest take on transom care
- Sail with confidence on well-maintained vessels
- FAQ
Key takeaways
| Point | Details |
|---|---|
| The transom is structural, not cosmetic | It carries engine loads, rudder hardware, and wave impact forces that affect the entire hull. |
| Moisture is the primary enemy | Hidden water ingress in composite cores is the leading cause of transom failure in modern sailboats. |
| Multi-day moisture monitoring matters | Single moisture meter readings mislead. Track trends over several days for an accurate picture of drying progress. |
| Rudder geometry affects load distribution | Placing rudder balance too far forward increases bending stress at the lower pintle, raising failure risk. |
| Repair sequence cannot be rushed | Effective transom repair requires stopping ingress, thorough drying, material removal, and only then re-laminating. |
Sailboat transom design: shapes and materials
The transom closes the aft end of the hull, but sailboat transom design varies considerably depending on intended use, era of construction, and aesthetic preference. Each shape carries specific hydrodynamic and structural consequences.
The most common configurations you will encounter are:
- Flat transom: The simplest form, common on older cruisers and dinghy classes. Straightforward to build, easy to mount hardware on, and practical for outboard engines. The trade-off is that a flat, near-vertical transom creates more drag at lower speeds.
- Raked transom: Angled aft from the waterline upward, reducing overhang and improving wave-shedding. Most modern production cruisers favour this approach.
- Reverse transom (tumblehome): The upper section leans inboard. This design is popular on racing yachts for its reduced weight aft and cleaner lines.
- Open transom: Leaves a gap at the waterline, allowing water to drain freely. Very common on cruising cats and sportier performance designs.
Material choice has a profound effect on transom strength and longevity. GRP (glass-reinforced plastic, also called fibreglass) sandwich construction dominates modern builds because it is lightweight, corrosion-resistant, and moulds into complex shapes. The core material, typically foam or end-grain balsa, provides stiffness without excessive weight. The weakness is that any breach in the outer skin allows water to saturate the core, and once that starts, the structural integrity drops silently over time.
Wooden transoms, particularly those built with marine-grade plywood and epoxy-saturated fibreglass, remain genuinely capable when maintained correctly. They are repairable with basic tools and allow local overbuilding at high-stress areas, which skilled builders have relied on for generations. Aluminium transoms appear on some performance and offshore designs, offering excellent strength-to-weight ratios and good resistance to fatigue cracking, though they require careful management of galvanic corrosion where dissimilar metals meet.
Pro Tip: When reviewing a second-hand sailboat, pay attention to the transom mounting points for any outboard bracket or rudder hardware. These are the highest-stress locations. Discolouration, raised edges around bolt holes, or soft spots within 100mm of fasteners are early warnings you should never dismiss.
Inspecting and maintaining your transom
Most transom failures are not sudden events. They develop slowly, often invisibly, and are preventable with a consistent inspection routine. Annual inspections plus re-sealing are considered the minimum standard for maintaining transom integrity in both GRP and wooden construction.
A practical inspection sequence looks like this:
- Visual scan: Check for crazing, cracks, impact damage, and discolouration. Pay particular attention to areas around fasteners and through-hull fittings where water entry is most likely.
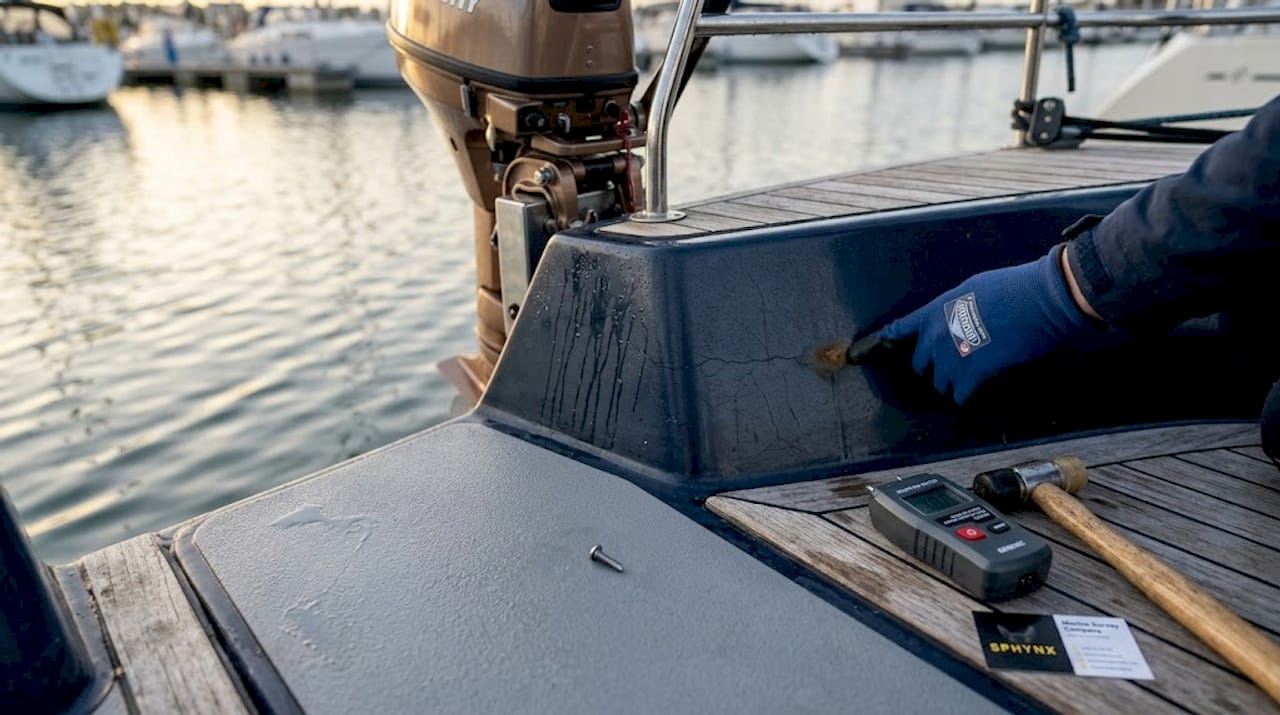
- Tap test: Use a small mallet or coin and tap across the transom surface systematically. A clear, solid sound indicates good lamination. A dull thud or hollow resonance points to delamination or a wet core beneath.
- Moisture meter sweep: Run a calibrated moisture meter across the entire transom face. Take readings in a grid pattern rather than spot-checking. High or rising readings near hardware holes need investigation.
- Fastener inspection: Check every bolt, pintle fitting, and engine-mount fastener for signs of movement, corrosion, weeping, or black staining around the holes. Movement under load is an indicator that the surrounding core has softened.
- Interior inspection: If accessible from inside the hull, check the inner laminate for water stains, soft panels, or signs that the core has degraded. Run your hand across the inner face and press firmly.
Hidden water ingress in the core is the leading cause of transom failures in composite builds. The frustrating part is that by the time a hollow tap or soft spot is detectable externally, the damage has usually been spreading for months. That is why the discipline of regular inspection beats any reactive approach.
Pro Tip: After any hard grounding, heavy weather passage, or collision, re-inspect the transom even if no visible damage is apparent. Impact loads travel through the hull and can cause internal delamination without breaking the outer skin.
Transom damage and repair techniques
When damage does occur, understanding the mechanism helps you choose the right repair approach. Transoms endure mechanical abuse from outboard engine torque, vibration, and wave slap, and through-hull hardware leaks accelerate that damage significantly.
The most common damage categories break down as follows:
- Surface cracks: Often cosmetic on GRP, but any crack near a fastener or fitting should be treated as a potential water entry point.
- Core saturation: Water infiltrates the core through failed sealant, cracks, or poorly bedded hardware. The core loses compressive strength, and the skins begin to move independently.
- Delamination: The bond between the outer skin and the core breaks down. Delamination in GRP transoms typically results from water ingress into the core material, and the repair process involves repeated flushing, monitoring moisture meter trends, and controlled drying before epoxy injection can be attempted.
The drying stage is where most DIY repairs fail. Moisture readings after core flushing vary nonlinearly due to changing material conductivity, which means a single reading after flushing can look worse or better than reality. Monitoring trends over multiple days, using heat lamps and multiple rinse cycles, gives the only reliable picture of true drying progress.
| Damage type | Material | Repair approach |
|---|---|---|
| Surface crack | GRP | Grind back, re-laminate with epoxy and woven cloth |
| Core saturation | GRP sandwich | Drill, flush, dry over days, inject epoxy or replace core section |
| Rot | Wood | Cut out affected timber, replace with marine ply, epoxy saturate |
| Delamination | GRP sandwich | Open skin, remove wet core, dry, re-core, re-laminate |
| Corrosion pitting | Aluminium | Grind, treat with etch primer, weld if structural, coat |
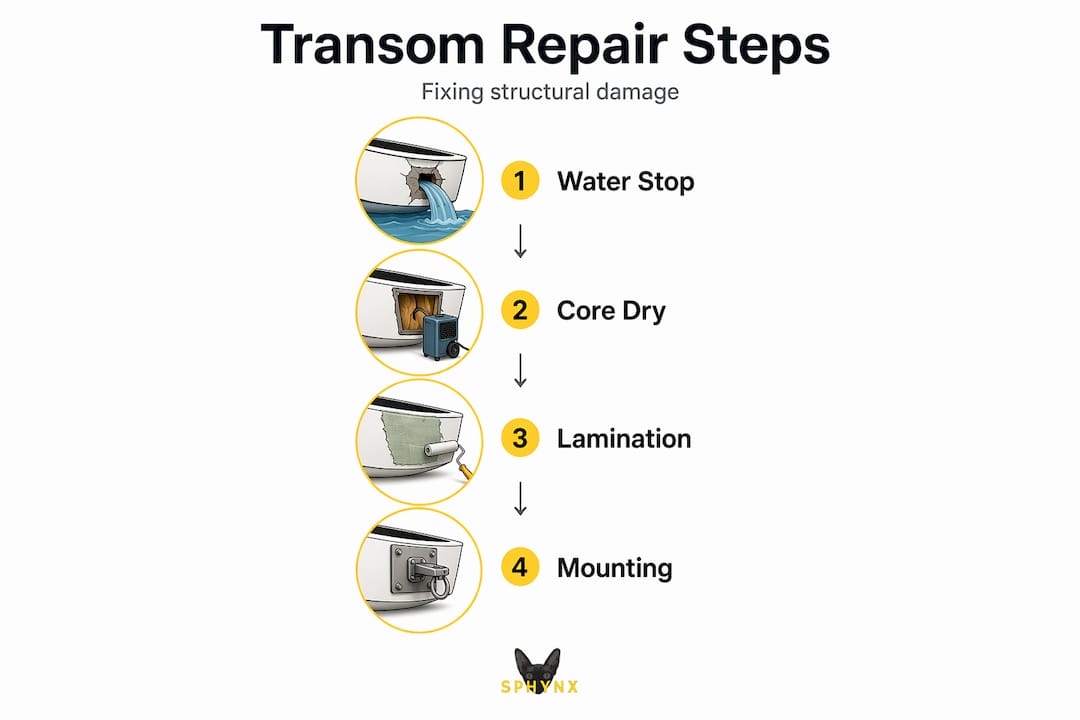
Effective transom repair in sandwich construction follows a strict sequence: stop the water ingress first, dry the core thoroughly, remove all compromised material, and only then re-laminate. Skipping or shortening any stage leads to repeat failure.
Structural stresses and rudder mounting
The transom carries concentrated loads that most owners underestimate. Two locations deserve particular attention: rudder hardware and outboard engine mounts.
On sailboats with transom-hung rudders, the geometry of the rudder blade relative to the lower pintle is critical. Placing the rudder-balance area forward of the lower transom corner affects the bending moment at that pintle, which is one of the highest stress concentration points on the entire aft hull section. Changing that geometry without recalculating the loads can increase failure risk substantially.
Key structural considerations include:
- Pintle pin shear: Shear failure of pintle pins is a recognised sudden-failure mode on transom-hung rudders. A double shear mounting system can halve the shear load on the pin, which is a significant safety margin improvement, especially on heavier boats or in offshore conditions.
- Engine mount fatigue: Outboard engines produce cyclic torque loads with every surge and astern application. Oversize backing plates on both the inner and outer transom faces distribute that load far more effectively than standard hardware.
- Local overbuilding: Transom construction in high-load zones commonly incorporates thicker timber sections or additional GRP plies specifically at rudder mounts and rope tie-in points. This is deliberate engineering, not over-caution.
Pro Tip: Experienced inspectors combine the tap test and moisture meter with a close look at fastener holes under magnification. Elongated or egg-shaped fastener holes on an aluminium or GRP transom are a definitive sign of movement and core degradation under load.
Transom extensions and boarding platforms
Transom modifications are increasingly common on cruising sailboats, with the most popular being boarding platforms and swim steps. The reasons are practical: getting crew back aboard from the water, launching tenders, and simply making life on the hook more comfortable.
Low-profile transom extensions are generally preferred over high-sided designs because they improve boarding without catching downwind waves, which is a real hazard on extension platforms that sit too high above the waterline. Typical extensions run between 18 and 22 inches aft of the original transom face.
Material choices for extensions should match or exceed the original transom specification. A well-laminated GRP extension bonded and tabbed correctly to the original structure can last the lifetime of the vessel. Teak decking on a platform adds grip and character but demands consistent maintenance to prevent water tracking into the substrate below.
Pro Tip: Before fitting any transom extension, confirm that your rudder travel and tiller clearance will not be compromised. An extension that fouls the tiller sweep at full lock is a serious handling hazard and far more expensive to remedy once the work is done.
My honest take on transom care
I’ve watched owners spend serious money on new sails, navigation electronics, and interior refits while the transom quietly softens behind them. In my experience, the transom gets neglected precisely because the damage it hides is invisible until it becomes severe.
What I’ve found is that most repair costs balloon not because the initial damage was catastrophic, but because drying and diagnosis were rushed. People want a two-day fix on a problem that needs two weeks of monitored drying. The composite structure will not forgive impatience. A single optimistic moisture reading after flushing does not mean the core is ready for epoxy injection. It usually means the solvent from the flush has temporarily altered the conductivity.
The other thing I’d push back on is the assumption that transom-hung rudders on older boats are inherently risky. They are not, provided the pintle geometry is correct and the fittings are properly maintained in double shear. What is genuinely risky is buying an older boat, assuming the transom hardware is fine because nothing has broken yet, and never removing the pintles to inspect the pin condition. That is where the sudden failures I’ve seen have originated.
— Sphynxbcn
Sail with confidence on well-maintained vessels
Understanding what goes into a structurally sound sailboat puts a different perspective on the experience of being on the water.

At Sphynxbcn, every vessel in our fleet is maintained to premium yacht standards, with structural integrity forming the foundation of every charter experience we offer. When you step aboard for a private yacht tour along the Mediterranean coast, you are sailing on a boat that has been properly cared for from stem to stern, transom included. If you are curious about what defines quality in a sailing vessel, our guide to luxury yacht rentals in Barcelona covers exactly what separates a well-found yacht from one that only looks the part.
FAQ
What is a sailboat transom?
The transom is the structural panel that closes the aft end of a sailboat hull. It carries rudder hardware, engine mounts, and boarding platforms while withstanding wave impact and cyclic mechanical loads.
How do I know if my transom needs repair?
Use a tap test across the entire transom face to check for hollow sounds indicating delamination, and scan with a moisture meter for elevated readings near fasteners or fittings. Soft spots, discolouration, or movement around bolt holes all warrant further investigation.
How long does sailboat transom repair take?
The physical lamination work may take a day or two, but the drying phase for a saturated composite core should be monitored over multiple days before any epoxy injection. Rushing the drying stage is the most common cause of repair failure.
What affects transom replacement cost?
Transom replacement cost depends on the material, the extent of core damage, access for drying and lamination work, and whether structural hardware such as rudder fittings needs to be refitted. GRP sandwich repairs are generally more involved than simple wooden plank replacement.
How do transom-hung rudders affect structural load?
The position of the rudder balance point relative to the lower pintle determines the bending moment at that fitting. Incorrect geometry increases stress concentration at the pintle, raising the risk of shear failure, particularly in offshore or heavy-weather conditions.